Showing posts with label concrete. Show all posts

Saturday, October 8, 2011

Construction Update September 25 to 30, 2011

Today I will try to get the construction of the last two weeks documented with photos... and it will likely take two blog posts.

Here is a little custom cutting to combine a top plate to tie together the new pantry wall to the old house and  a new support post at our front door in the existing wall.

This top plate ties into the 3" x 8" post that fits into the wall and will support an :LVL beam that carries the wall and roof load adjacent to the house.  This is the only part of the old house that we have used to carry any of the new construction...

Only in this corner of the original laundry room closet does our new addition overlap our existing house. Once the beams and joists are in place it will take away a small corner of the closet about 15" x 18"... you can see what we had to cut out to make room for the floor joists to be installed.

In order to build the stairwell and finish off the floor joists right up to the house we had to remove all the shingles, soffit and rafter tails on the eaves on the entry side of our house.  Brendan has lots of experience taking off old cedar shakes to install new roofing... the past three years his main job had been with a roofing sub-contractor.

The chainsaw was the easiest way to cut off the rafter tails.  And Brendan did a great job of cutting them off without hitting any nails... which was a little tricky.

Brendan is setting the TGI's into the header for the stairwell.  I removed the rest of the siding in this section so that I could put it back and cover the new support posts as well as the LVL  beam adjacent to the house.

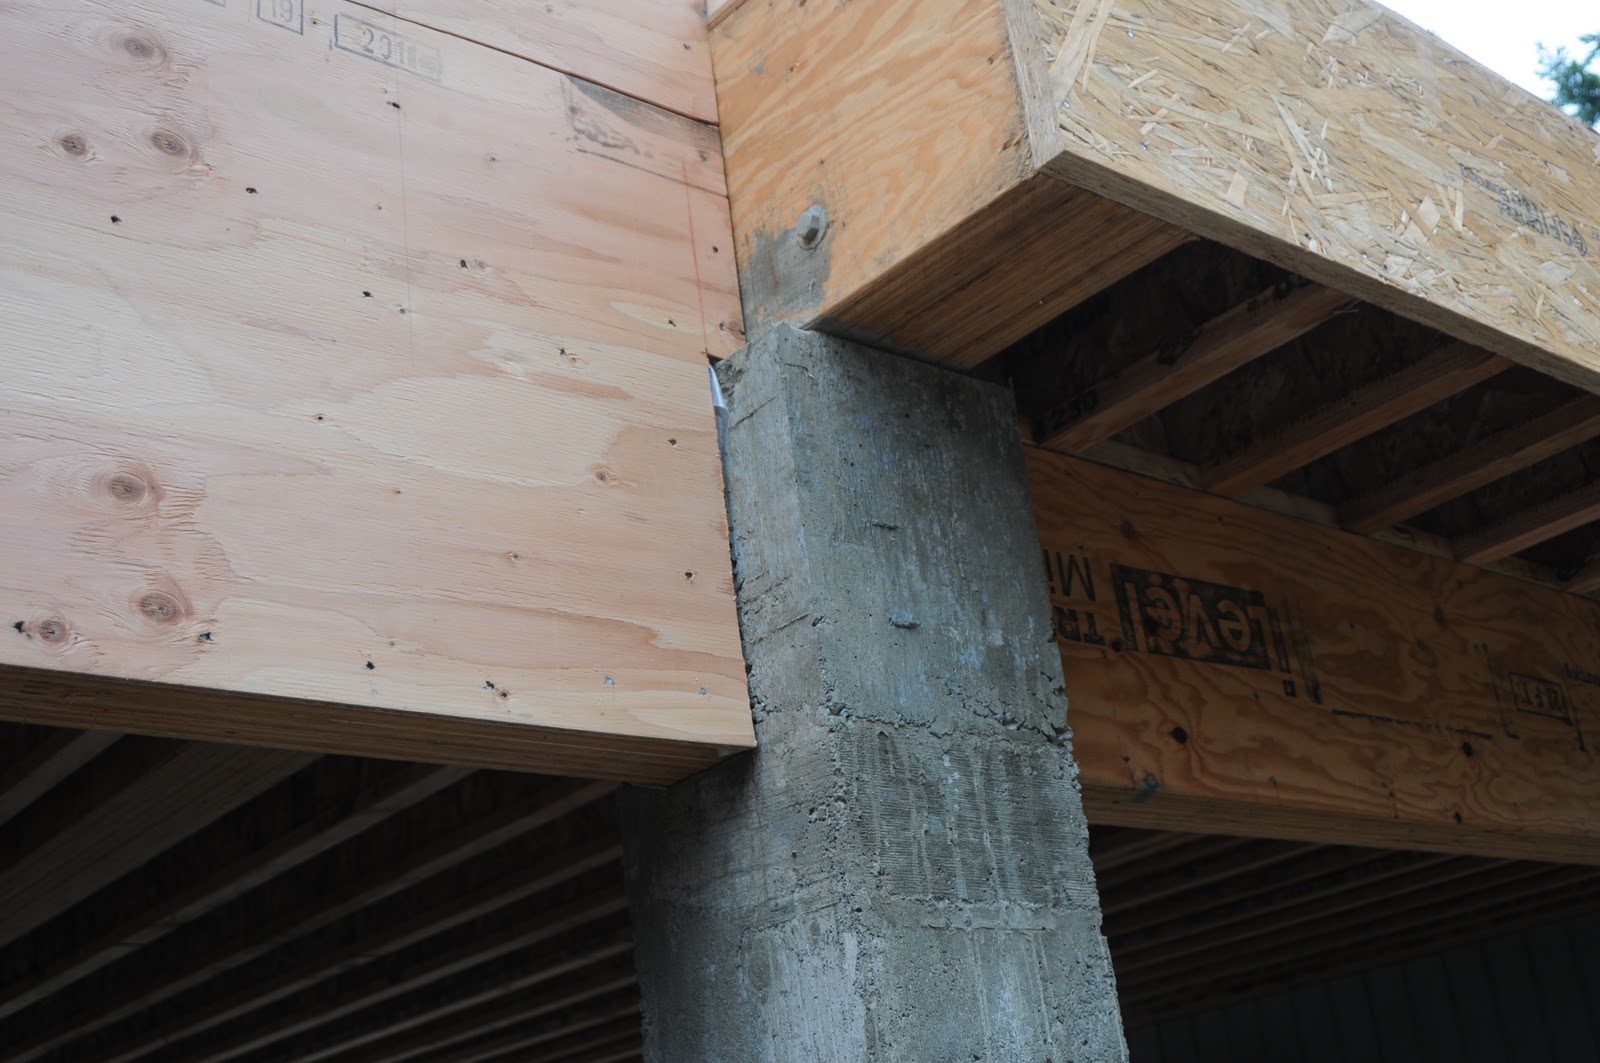
Before we put the 3/4 inch T&G floor plywood on the studio joists, I wanted to extend the concrete posts higher to encase the LVL beams... it would be impossible to do it afterwards.  Ritchie Smith liked this idea, but told me to protect the wood from any reaction of the concrete... so I stapled some 6 mil poly to the beams first.  Each beam has either two 1/2 inch rebars or ready-rods  that go thru the beam and are attached to vertical rebars in the concrete.  This is on Foundation post #4.

Each one was a little different, but the concept was always the same.  Here on the top of Foundation Post #2  I used a ready-rod thru the beam, and wrapped a rebar around the end of the LVL 3-ply beam and back to the other end of the same ready-rod.  After the concrete is poured into the form we will face three of the four posts with 3" of sandstone rock. 

This is the detail of the post inside the garage... Foundation Post #1... the only one that will not be faced with rock after.  Note how we also put four 1/2" x 3" lag bolts with washers to help hold the concrete and the beam together.  In the end of the beam I used a couple of 5" long lags.  This is all to help to keep the beams from twisting under seismic pressure.

Here is Foundation Post #3 with forms in place ready for concrete.  It was no small task to get  the concrete into the small opening on the top of each of these.  Thus we had to do this before putting any of the floor plywood.  Even Shirley helped Brendan and me to place the concrete.  It took three full wheelbarrows of concrete... plus another part mix to fill all four forms.  This one task took almost a full day to complete.  

Once we stripped the forms off and saw the concrete done, it just looked like it was always that way.  Now, with this concrete post complete, it gives me the base on which I will apply the rock facing.  But the most important thing is that structurally it keeps the integrity of the LVL beams from any movement... much better than any metal Simpson bracket one can buy.

We look for every opportunity to use the tractor to help us lift anything up.  We were able to take about 6 or 7 sheets of 3/4" T & G fir plywood at one time... and the studio floor will need about 32-34 sheets.

We put down floor plywood on this entire level in a single day and used over 15 pounds of 2" deck screws.  This floor had better not even think of squeaking!

I was not prepared for the great view that we had once we were standing on the studio floor.  See Shirley's garden boxes on the knoll.  

When Brendan told me around 11 AM that he was not feeling good and wanted to quit at noon, I told him no problem and Shirley went with me to Victoria for the afternoon.  I was able to pick up some supplies... like a lift of 60 sheets of 1/2" sheathing for the walls, two 12" x 14 foot stair stringers and 1" stair tread material in 12 foot lengths and a new chain saw.

By banding the 14-foot boards to the plywood I was able to bring them home in my short box pickup with no problem.  This truck has never came home from Victoria once in the past three years without having a load of gravel or something.  We seldom take the car to town as there is always of load to bring back.


Friday, September 2, 2011

Construction Update September 2, 2011

As I was putting my tools away the sunset on Friday evening begged me to grab my camera and capture this moment.  It has been a really good week with lots of progress on the project.

The black hole in the garage wall is a hole I cut earlier in the week at the exact spot where the major beam goes into the workshop.  I then ran a string at the correct height between the garage and house and squared the new building at approximately 92 inches above garage floor... which is where the bottom of the main beam will rest.  I had to trim off a few rebars that were too high so the beam can set on the top of the concrete.  When I squared the building I was able to confirm that the distance between the beams was 22'  8" outside to outside in the main area where there is no cantilever sections.  This gave me great comfort, as I had ordered the LVL laminated beams and truss joists... and for the most part they are going to come 23 feet... and I can then trim them to fit.

When we first conceived expanding the studio over a part of the garage, we thought we would have metal or a wooden posts to hold everything up.  But after talking to engineers about the project, Brian, my friend in Phoenix suggested I consider a concrete post with rebar inside.  As this soon became the most advantageous system we forged ahead with it.  But when I went to put the rebar cage into the hole I first realized that there was less than 8 inches between the overhead door tracks on each side of the common wall.  Once I removed a section of the wall it became very clear that I could not run an 18" or even a 13" concrete post between those overhead door tracks.  So in consultation with Ritchie Smith, my engineer, we came up with a modification at the top.  It meant bending the 5/8" rebars near to the top and making a notch in the post for the door tracks.  These are things that come up that one never imagined would be a problem.  Hence, I am making the concrete post a full 18" of concrete up to the bottom of the overhead door tracks.  The whole place may fall down, but this post is huge and has a great foundation.

Friday Shirley made a gravel run for me... and I hope that will finish off the concrete stage.  Along with the Navy Jack she brought another six bags of cement... which brings our total to date to 50 bags, if I use all that I have recently purchased.  So far 32 bags have been used.

If you look closely behind the bags of cement there is the 18" x 18" form for column #1 in the garage.  We poured the bottom half, up to the cleat on the form this past Tuesday... and today I added the top half without stripping off the bottom... and we will put concrete in the balance on Sunday.  It will not be easy to get this one done since I have to work between the existing trusses in the garage.

You can see column #2 in the background.  We also poured concrete up to 6" above grade on Tuesday.  This is the rock ledge height for this column.  From here to the top the concrete will be 13" square, leaving me 2.5" for rock facing.

We also poured the bottom part of the column #4 on Tuesday, which matches #3 for height to rock ledge.

On Thursday when I was excavating for #6 (the stair foundation) I dumped three loads of dirt removed from there into #2.  I then had Shirley come with a garden hose and I brought several loads of fill dirt that I had stock piled and we completely backfilled #2.  I doubt there will be much settling as Shirley really soaked it good and I threw in lots of rocks.  Does it ever feel good to have that huge excavation backfilled... and we even dressed the top with crusher chips... my favourite road and yard gravel topping.

Again you can see a yellow string at the top of the columns... this is part of the squaring the building exercise.  The laser level on the tripod makes finding the correct height of the column pretty easy

It won't take much to backfill #4 on Sunday.  We developed a good solution to prevent settling of the driveway, which has some serious undercuts to fill in.  We found using between 1 to 1.5 shovels of cement to 15 shovels of dirt and rock makes a very solid backfill... with no shrinkage.  It worked really good on #3 the week before.

No. 3 was about 40 inches of backfill and using the reduced cement formula in a soupy mix not only filled in all the cavities, but there has been no noticeable shrinkage.

The nice pile of gravel in the background will go into foundation #5 and #6... plus the tops of the columns... and then we are done with concrete.

I finished forming the walls of the foundation in #6 this week and by Sunday evening I hope this will have concrete in it.  The cross bracing looks kind of honky... but with only one side formed with plywood and the other side dirt walls, I had to come up with some way to keep the walls straight under the pressure of concrete.

Foundation #6 is for the stairs and the wall adjacent to the house that will support the second story walls and roof rafters.

I removed a few more boards of siding in two places this week... where 3" x 8" posts will go to carry the wall and roof load.

Each rebar that attached to existing house has epoxy in the hole.  Two horizontal footing bars... and two vertical foundation bars.

I took half a dozen photos of this footing and foundation preparations and emailed them to my engineer... hoping to hear back with a green light so I can pour concrete footing here this weekend.  My concrete mixing helper goes back to school after the weekend.

The last one... #7 foundation for the pantry came out really good.  My careful cutting of plywood to follow the contours of the pavement payed off.  My home made anchor blots worked out just fine.  I am now ready to set up the floor joists... but I still await another quote so that I can decide who will be supplying the lumber and plywood.

This coming week on September 8 we are scheduled to get delivery of the beams and TGI's.  It will be interesting to see if they can be delivered on schedule. Soon or very soon we will be done with concrete and on to bigger and better things... but without a good foundation the rest would be in vain.

I enjoy telling people that this house was built according to the Bible... it has been built on the solid rock!  ...and we have cut no corners on the excavation, concrete or steel.  So we expect that our new addition is designed to withstand the high winds, heavy snow load and even earthquakes, if they should happen.  Fortunately we do not get hurricanes here... even though some days it sure feels like it!

But I did talk to a lady at the stock brokers office this week who said her name was Irene.  I jokingly asked her if she got much abuse because of the hurricane last weekend... and she said she sure did... it comes with the territory.

Saturday, August 13, 2011

Deepening and Widening the Column Excavations

Over a week ago I worked on this No. 1 excavation... widening it on each side, to get the maximum possible footing size.  Then I twisted my brain around how best to layout the rebar.  To go straight with the world here didn't work as good as going straight with the biggest rock.

Each bar has been drilled into the rock on one end and after blowing out the hole with an air compressor I put a generous amount of epoxy in and then pushed the rebar into the hole.

The number "1" is on a stick that I set up to guide me in knowing when there is enough concrete to make the concrete footing 12 inches thick.

In most footing preparations one sets up forms at the proper height.  If you want 12" deep footing you make the forms 12" high.  But here there are no forms except the earth walls of the excavation, and no easy way to know when the concrete is deep enough.

So I came up with a simple tool to help me.  As I am placing the concrete in the hole the bottom of this stick is 12 inches off the bottom of the excavation... 16 inches below the garage floor.  I can move it around all sides easily to check when placing the concrete to insure I have the right thickness of footing.

Ritchie Smith. Hoel Engineering, told me that I needed to make hole No.2 a little wider and deeper than I had already.  So, I made it a full foot wider than he told me... and an extra 6 inches deeper.


There was this rock in one corner that was too big for me to lift out with the tractor.  Trust me I tried... but then decided that it would be easier to leave it there and just pop off the top of the rock.

So with my 12" rock saw I made a series of cuts about 2-1/2 inches apart.

It almost looks like sliced bread... however the rock doesn't cut as easy as most bread!

I then take my heavy rock hammer and one inch chisel and break each slice of rock off.

Once that layer is removed I did another series of cuts and this picture shows breaking the final layer off.

I was able to take off a full 8 inches and now can run the rebar grid each way right into the corner without any hassle.  The horizontal white board gives me the top of footing guide again, making it easy to get the concrete 12 inches thick overall.

I appreciate having an engineer who explains the reasons for criteria. This gave me the choice of going a little deeper and wider, which is better able to withstand the uplift and twisting in the event of an earthquake.
Hole no. 3 was such a hard dig to just get it 22 inches deep initially, I soaked the bottom of this hole a couple of times.  It made the digging a lot easier... but it seemed like it made the rocks grow!  Ritchie asked me to increase this hole to 4 feet by 6.5 feet and 36 inches deep.  

I needed to use the tractor at least 5 times to lift heavy rocks out of this hole... and you can see I was working pretty late in the day as Shirley had to use flash to capture this shot.

There were also lots of smaller rocks that I could dig up and lift out by hand... some will be used in future rock walls and rock facing.

I never realized when I started how deep that this hole would finally end up.  I just kept digging and kept pulling out rocks until I reached one rock that was bigger than my John Deere could even budge.

I drilled into the rock and pounded in a short rebar to prevent my chain from slipping off the rock... but this was just too much rock for either of us to handle.  So I ended up digging lower and was able to set a full pattern of rebar at about 52 inches below pavement.  This will now tie the huge rock into the footing, providing more weight to the foundation.

My next task was to build the rebar columns that will be poured full of concrete. We tackled the toughest one first... this one had 16 vertical bars, 12 horizontal wraps 11 inches square and 13 -  4" x 11" wraps in between.

Here the engineer specified the rebar layout showing the difference between pad 3 and pads 1, 2 and 4.

To bend the horizontal wraps I needed to make this jig by welding a couple of short rebars to an angle iron and attach it the workbench.  I was lucky to have guests coming from Victoria who brought me a new package of welding rods since I could not buy any here on Mayne Island.

With a stop set at 11 inches it is easy to make all the square wraps the same size using a short piece of steel pipe as a bending handle.

We learned how to tie rebar in Mexico, so made a couple of these hooks out of 1/4 inch scrap wire I found at Home Hardware here on Mayne Island.

I doubt that there are very many women in this country who know how to tie rebar... but Shirley's help was much appreciated this week.

There is more than 240 wire ties in this single column... and we have another three to make up next week.

With this column weighing over 240 pounds, it would take more than me and Shirley to lift it into the hole.  Enter John Deere to the rescue!

Once in the hole I tied the hooks on the bottom to the footing rebar and then plumbed it and braced the column both ways. This one is now ready for concrete.... but I first must get my building permit and get the Regional District Building Inspector to give me a green light.