With the Thanksgiving holiday and Brendan calling in sick, we went to town on Tuesday and really only worked three full days together on the project... and I think it is safe to say it was the hardest three days yet on this site. We were building angled walls... and to get them square and plum when set up had my brain working overtime.
Cutting out the windows was the easiest part... and I could do it in short order.
Tying together the angled walls required cutting angles into the top plate that overlapped. It was a thing of beauty when it worked out right.
On Friday morning before Shirley went to town she helped us lift up and put in place this 14 plus foot high window wall. It was by far the heaviest wall we have put up to date... the 8 windows had 8 headers... and each one is built up and very heavy. Then we had to cover them with 1/2 inch plywood.
When she came back we had another wall that is over 17 feet high almost ready to go up... but we still have more plywood to nail in place first. I told Brendan that by the time we get these walls done we will know how to build them right the first time every time... something that we can not say we've done.
This is what we looked like at the end of this past week. By the end of this new week we hope to have up all the other walls, the main heavy beam that will carry the clearstory windows and the higher roof truss joists. We just got the last three main roof beams delivered mid day on Friday... and on Monday by noon I expect we will have them in place and laminated together.
Shirley enjoys taking photos of the views from all the windows. This one is of the three windows that are in the stairwell area.
This is the view from the north west corner of the studio over looking the knoll to the right of the water tank... seeing the top of the cabin and some of the meadowland.
From the same window with a slightly different angle we see the corner of the greenhouse, more of the meadowlands and in the foreground the TGI roof rafters under protective tarps.
I think my favourite non-water view is out this single east facing window overlooking Shirley's sunken garden... which she lately has been calling her sunken jungle. It has really filled out this past summer and I think it's looking really great.
We wish you and us all a really great week. Stay safe and don't work too hard, eh?
"Everyone who's ever taken a shower has had an idea. It's the person who gets out of the shower, dries off and does something about it who makes a difference." -Nolan Bushnell
Sunday, October 16, 2011
My DeWalt Service Dilemma
I have for years been a dedicated DeWalt tool fan... and just this past week pulled all my DeWalt tools together to take this photo. I then did an inventory of my DeWalt tools and counted 13 cordless products and 14 A/C powered tools.
There is hardly a day in my life that my hand does not touch a DeWalt tool.
I have always bought only DeWalt saw blades, drill bits and cutting discs... and in fact just bought both 10" and 12" saw DeWalt blades this past week. But our local Slegg Construction Materials Ltd. store has wronged me in my last two customer service events... and I am greatly distressed to think of where I will be getting future Dewalt service. As you will see, I would be crazy to give them another tool to send off for service... and I will be hard put to want to even buy another DeWalt tool because of this.
"Screw me once, shame on you. Screw me twice, shame on me."
A couple of months ago I stopped in at Slegg Lumber in Sidney, a DeWalt dealer, and asked Dave Bennett if he could help me with belt alignment on this sander. I told him the problems I was having with my sander.
When I noticed sanding belts were breaking far too often I decided to try to find out why. Shirley had been using the sander in prepping the sun decks this past summer... which involved sanding some already painted cedar. Some of paint dust got into the works and over time formed globs of paint on the front rollers. I deducted that possibly these thick, uneven globs of old paint might be the reason the sanding belts were breaking far too often. In any event, I went to work and cleaned off the rollers.
I could clean the lower roller easily enough after the sanding belt was removed... but to get to the upper roller I had to remove the front assembly. When a couple of small rollers fell out as I took it apart, I was worried I might not get it back together the same way that it came from the factory. I figured that these small rollers had something to do with the adjustment of the belt tracking alignment. Sure enough, after trying a couple of possibilities of where to put those rollers in the re-assembly I realized I couldn't get the tool to work again as it used to... I lost the ability to adjust belt tracking.
Dave Bennett sent me to a tool website that showed the parts, but that did not help me to know where to put these two small alignment rollers. So I took the sander in to Dave and told him I needed help to get my sander put together right. All the parts were there, but the alignment rollers were not in the right place.
So, he sent it off and a month later I got a call that the sander was back. When I went to pick it up he said they replaced the front assembly and he handed me a bill for $110. I complained about what ever happened to simple service? This same sander had gone thru a DeWalt service overhaul under warranty during my first year I owned it... and I was told then they changed the front assembly.
Dave told me that the way they now were handling service issues on DeWalt tools was that they were not calling the owners with any estimate or approval for work needed... that they would just look at the tool and replace any worn parts, give the tool a 90-day satisfaction guarantee and whatever it cost we would have to pay.
I told him that I didn't believe that this tool needed a new front assembly as this tool had not done that much work since it had been rebuilt... I just took the tool apart and could not get it put back together right again. I was not happy to have to pay $110 to have them but my tool back together again. It didn't even look to me that the front assembly was replaced, as the front roller was the same one that I had cleaned paint globs off.
My second DeWalt service issue involved this framing air nailer. As I started to use it this fall I notice after only a few clips of nails that there was a serious air leak in the gun... and it seemed to be around the trigger. I opened it up and found that one of the O-rings had been blown. So I did a little checking online and found that there was a shop in Victoria that had the right O-ring... and I picked it up and put it in. However, there still was an air leak.
So I took it into Slegg Lumber and they sent it into DeWalt repair service. Again I got a call that the nailer was back and ready for pick-up. However when I went to get it they told me that they changed the cylinder and piston, new O-rings and trigger... cost was $148 plus tax... $165.76.
That is when I hit the roof. This tool had not even used a full box of spikes. I told Dave Bennett that when I bought the nailer I also bought 4 boxes of 3" spikes... and at this point had not used even one box of spikes! When I had the tool apart to change the O-ring I was amazed at how clean and perfect the cylinder and piston was. I told him that something really smells wrong with this.
When I got home I looked at the box of spikes... and in fact I had only used half of the first box. So, it sure bothered me that these guys were making decisions and replacing some significant parts with no customer approval. This seems totally wrong to me and I have vowed not to give any more of my DeWalt tools to Slegg Lumber for service. What a rip off!
This past week I stopped in at Slegg and Dave Bennett was not in so I asked to talk to the store manager. He was not in at the time either, so I asked who was in charge when the manager was not there? They directed me to Dan Chan... who listened attentively to my DeWalt customer service beef and said he would look into it and get back to me. That was last Tuesday... and I have not heard anything as of this point in time. I had sent an email to him on Friday, but at the end of the day found a "No-go" message in my Inbox... so he did not get it.
Dan Chan took a copy of this receipt. He told me that my tool was sent by courier to the DeWalt Service depot in Burnaby and back. I would like to see the paperwork on that cost. Also I would like to see the paperwork on what the DeWalt Service Depot did on my tool. There must be some record of what they did, but Slegg has not yet given me anything that tells me this. Is this not a reasonable request? My only record of the transaction is the copy in the photo above.
I have been wondering if my case is an isolated situation, or are there others who are not happy with the new DeWalt customer service policy at Slegg Lumber. Any suggestions?
BONUS SLEGG STORY: About a month ago when Shirley went to Victoria by herself I gave her a list of things I needed to pick up at Slegg's or Home Depot. She went to Slegg Lumber first and got everything on the list, including a box of 2-3/8 inch nails for my DeWalt framing nailer. On my list I had put 2-1/2 inch nails, but it seems like nobody stocks any in this part of the world... they all are using 2-3/8 inch nails. So, after Shirley bought them at Slegg's she double checked at Home Depot and asked them if they handled 2-1/2 inch nails for my air nailer. They looked thru all the stock and none could be found. However she saw the same boxes of 2-3/8 inch nails there... and the price was $65.99. She didn't know what she paid at Slegg's so was anxious to see what they had charged us... Would you believe $113.76 for the identical box of 5000 Paslode nails!
So we called Slegg's and asked if they had made a mistake. No they said, that was the price. And since I had not had that item previously quoted on my material list the best they could do was to take off 15%... $96.69. We told them that Home Depot had them on at 65.99 and they said that they could not even buy them for that price... which I seriously doubted. We told them they would be getting this box back if that was the case.
A GOOD Slegg Customer Service Story
On our next trip to Victoria I called to Slegg in Sidney and asked if they had 1" stair tread material in 12 foot lengths. They said not in their store, but the man I talked with said he thought the Admiral Way store did. So I asked him to give me that number and I called them. Yes they did and Jeff told me it would be at the front counter when I arrived. I asked Jeff if I could pick up other supplies quoted by the Sidney store and they said yes... so I picked up a lift of 1/2 plywood and a couple of 14 foot 2 x 12's for stair stringers. While there I thought I would check with them on their best price for 2-3/8 inch nails... and he said that the very best price he could give me was $75.65. I told him the Home Depot had them at $65.99. Jeff said that he had reduced the quote to cost plus 20 points... and that was his best shot. From this I deducted his cost was about $63.00.
I was very impressed with the customer service at this store. For example the yard serviceman who brought me the 2 x 12's on his fork lift asked me what I was using them for. I told him I was making stair stringers with them. He said, "These have some checks in them and you may have some of the stringer points fall off. Come with me and let's pick out some better ones than this." I really appreciated that. We went to the stack of l4 foot material... he lifted off the top pallet and opened a new pallet and we picked through more than a dozen boards to find a couple of perfect ones. I told him how much I appreciated him looking out for me. That was an exceptional man. He also helped me load the plywood and banded my load together so I could get everything home safely on the truck. Check out the beautiful banding job that he did for me in the photo below. 14 foot 2 x 12's on a short box. We cut 4 feet off the 12-foot stair treads so the 8 foot pieces fit on top of the plywood lift... and then I put a couple of 4 foot ones on the end gate to reduce the fulcrum point overhang. We then banded the 8-foot treads on top of the plywood so there was no risk of them going thru the back window of the truck. A perfect loading job... a thing of beauty!
So our next stop was to buy the $65.99 box of nails at Home Depot and then take the over priced box back to Slegg in Sidney. When I handed Dave Bennett our Slegg receipt with the box of nails and told him why they were getting them back he asked me if I had already bought another box at Home Depot... and I showed him the Home Depot receipt. He indicated that he would have matched their price if I hadn't already bought them. This was the day I picked up my air nailer from him, so he knew that he was off side with me for the repair costs of $165.76 on a nailer.
Isn't customer service fun?
I sure hope that Slegg can get their act together on how to handle DeWalt Customer Service. The way they are doing it now may work easier for them... but they are driving customers away from wanting to buy DeWalt tools and for sure I won't use them for repairs unless I can talk to the DeWalt service shop. In both of the situations I do not believe that my instructions were communicated to the service repair shop. Somehow I do not think that my case is an isolated one... and there are likely many others who have been shocked by huge repair costs and wish they were in the loop on approving costly repairs.
There is hardly a day in my life that my hand does not touch a DeWalt tool.
I have always bought only DeWalt saw blades, drill bits and cutting discs... and in fact just bought both 10" and 12" saw DeWalt blades this past week. But our local Slegg Construction Materials Ltd. store has wronged me in my last two customer service events... and I am greatly distressed to think of where I will be getting future Dewalt service. As you will see, I would be crazy to give them another tool to send off for service... and I will be hard put to want to even buy another DeWalt tool because of this.
"Screw me once, shame on you. Screw me twice, shame on me."
A couple of months ago I stopped in at Slegg Lumber in Sidney, a DeWalt dealer, and asked Dave Bennett if he could help me with belt alignment on this sander. I told him the problems I was having with my sander.
When I noticed sanding belts were breaking far too often I decided to try to find out why. Shirley had been using the sander in prepping the sun decks this past summer... which involved sanding some already painted cedar. Some of paint dust got into the works and over time formed globs of paint on the front rollers. I deducted that possibly these thick, uneven globs of old paint might be the reason the sanding belts were breaking far too often. In any event, I went to work and cleaned off the rollers.
I could clean the lower roller easily enough after the sanding belt was removed... but to get to the upper roller I had to remove the front assembly. When a couple of small rollers fell out as I took it apart, I was worried I might not get it back together the same way that it came from the factory. I figured that these small rollers had something to do with the adjustment of the belt tracking alignment. Sure enough, after trying a couple of possibilities of where to put those rollers in the re-assembly I realized I couldn't get the tool to work again as it used to... I lost the ability to adjust belt tracking.
Dave Bennett sent me to a tool website that showed the parts, but that did not help me to know where to put these two small alignment rollers. So I took the sander in to Dave and told him I needed help to get my sander put together right. All the parts were there, but the alignment rollers were not in the right place.
So, he sent it off and a month later I got a call that the sander was back. When I went to pick it up he said they replaced the front assembly and he handed me a bill for $110. I complained about what ever happened to simple service? This same sander had gone thru a DeWalt service overhaul under warranty during my first year I owned it... and I was told then they changed the front assembly.
Dave told me that the way they now were handling service issues on DeWalt tools was that they were not calling the owners with any estimate or approval for work needed... that they would just look at the tool and replace any worn parts, give the tool a 90-day satisfaction guarantee and whatever it cost we would have to pay.
I told him that I didn't believe that this tool needed a new front assembly as this tool had not done that much work since it had been rebuilt... I just took the tool apart and could not get it put back together right again. I was not happy to have to pay $110 to have them but my tool back together again. It didn't even look to me that the front assembly was replaced, as the front roller was the same one that I had cleaned paint globs off.
My second DeWalt service issue involved this framing air nailer. As I started to use it this fall I notice after only a few clips of nails that there was a serious air leak in the gun... and it seemed to be around the trigger. I opened it up and found that one of the O-rings had been blown. So I did a little checking online and found that there was a shop in Victoria that had the right O-ring... and I picked it up and put it in. However, there still was an air leak.
So I took it into Slegg Lumber and they sent it into DeWalt repair service. Again I got a call that the nailer was back and ready for pick-up. However when I went to get it they told me that they changed the cylinder and piston, new O-rings and trigger... cost was $148 plus tax... $165.76.
That is when I hit the roof. This tool had not even used a full box of spikes. I told Dave Bennett that when I bought the nailer I also bought 4 boxes of 3" spikes... and at this point had not used even one box of spikes! When I had the tool apart to change the O-ring I was amazed at how clean and perfect the cylinder and piston was. I told him that something really smells wrong with this.
When I got home I looked at the box of spikes... and in fact I had only used half of the first box. So, it sure bothered me that these guys were making decisions and replacing some significant parts with no customer approval. This seems totally wrong to me and I have vowed not to give any more of my DeWalt tools to Slegg Lumber for service. What a rip off!
This past week I stopped in at Slegg and Dave Bennett was not in so I asked to talk to the store manager. He was not in at the time either, so I asked who was in charge when the manager was not there? They directed me to Dan Chan... who listened attentively to my DeWalt customer service beef and said he would look into it and get back to me. That was last Tuesday... and I have not heard anything as of this point in time. I had sent an email to him on Friday, but at the end of the day found a "No-go" message in my Inbox... so he did not get it.
Dan Chan took a copy of this receipt. He told me that my tool was sent by courier to the DeWalt Service depot in Burnaby and back. I would like to see the paperwork on that cost. Also I would like to see the paperwork on what the DeWalt Service Depot did on my tool. There must be some record of what they did, but Slegg has not yet given me anything that tells me this. Is this not a reasonable request? My only record of the transaction is the copy in the photo above.
I have been wondering if my case is an isolated situation, or are there others who are not happy with the new DeWalt customer service policy at Slegg Lumber. Any suggestions?
BONUS SLEGG STORY: About a month ago when Shirley went to Victoria by herself I gave her a list of things I needed to pick up at Slegg's or Home Depot. She went to Slegg Lumber first and got everything on the list, including a box of 2-3/8 inch nails for my DeWalt framing nailer. On my list I had put 2-1/2 inch nails, but it seems like nobody stocks any in this part of the world... they all are using 2-3/8 inch nails. So, after Shirley bought them at Slegg's she double checked at Home Depot and asked them if they handled 2-1/2 inch nails for my air nailer. They looked thru all the stock and none could be found. However she saw the same boxes of 2-3/8 inch nails there... and the price was $65.99. She didn't know what she paid at Slegg's so was anxious to see what they had charged us... Would you believe $113.76 for the identical box of 5000 Paslode nails!
So we called Slegg's and asked if they had made a mistake. No they said, that was the price. And since I had not had that item previously quoted on my material list the best they could do was to take off 15%... $96.69. We told them that Home Depot had them on at 65.99 and they said that they could not even buy them for that price... which I seriously doubted. We told them they would be getting this box back if that was the case.
A GOOD Slegg Customer Service Story
On our next trip to Victoria I called to Slegg in Sidney and asked if they had 1" stair tread material in 12 foot lengths. They said not in their store, but the man I talked with said he thought the Admiral Way store did. So I asked him to give me that number and I called them. Yes they did and Jeff told me it would be at the front counter when I arrived. I asked Jeff if I could pick up other supplies quoted by the Sidney store and they said yes... so I picked up a lift of 1/2 plywood and a couple of 14 foot 2 x 12's for stair stringers. While there I thought I would check with them on their best price for 2-3/8 inch nails... and he said that the very best price he could give me was $75.65. I told him the Home Depot had them at $65.99. Jeff said that he had reduced the quote to cost plus 20 points... and that was his best shot. From this I deducted his cost was about $63.00.
I was very impressed with the customer service at this store. For example the yard serviceman who brought me the 2 x 12's on his fork lift asked me what I was using them for. I told him I was making stair stringers with them. He said, "These have some checks in them and you may have some of the stringer points fall off. Come with me and let's pick out some better ones than this." I really appreciated that. We went to the stack of l4 foot material... he lifted off the top pallet and opened a new pallet and we picked through more than a dozen boards to find a couple of perfect ones. I told him how much I appreciated him looking out for me. That was an exceptional man. He also helped me load the plywood and banded my load together so I could get everything home safely on the truck. Check out the beautiful banding job that he did for me in the photo below. 14 foot 2 x 12's on a short box. We cut 4 feet off the 12-foot stair treads so the 8 foot pieces fit on top of the plywood lift... and then I put a couple of 4 foot ones on the end gate to reduce the fulcrum point overhang. We then banded the 8-foot treads on top of the plywood so there was no risk of them going thru the back window of the truck. A perfect loading job... a thing of beauty!
So our next stop was to buy the $65.99 box of nails at Home Depot and then take the over priced box back to Slegg in Sidney. When I handed Dave Bennett our Slegg receipt with the box of nails and told him why they were getting them back he asked me if I had already bought another box at Home Depot... and I showed him the Home Depot receipt. He indicated that he would have matched their price if I hadn't already bought them. This was the day I picked up my air nailer from him, so he knew that he was off side with me for the repair costs of $165.76 on a nailer.
Isn't customer service fun?
I sure hope that Slegg can get their act together on how to handle DeWalt Customer Service. The way they are doing it now may work easier for them... but they are driving customers away from wanting to buy DeWalt tools and for sure I won't use them for repairs unless I can talk to the DeWalt service shop. In both of the situations I do not believe that my instructions were communicated to the service repair shop. Somehow I do not think that my case is an isolated one... and there are likely many others who have been shocked by huge repair costs and wish they were in the loop on approving costly repairs.
Labels:
DeWalt Service,
DeWalt tools,
Slegg Customer Service
Sunday, October 9, 2011
Construction Update October 2 to 7, 2011
This is the stairwell opening into which our new stairs are to go. I had hoped to find someone to build them for me, as it might save me a days work. In Kelowna there is a company called Rise 'n Run that we used in our projects there... and they saved us both time and money. But after calling four companies, the only one I could find to even quote on them was a company in Nanaimo. It didn't seem to me that they would be quicker... or save me money.
On Sunday afternoon I did the layout for the new stairs which had a 7-5/8" rise and 10" run.
I enjoyed cutting out the stair pattern with the circular saw...
I then cut out the corners with the jig saw to avoid over cutting and losing strength.
I just tacked the stringers in place to see how they looked before cutting out the treads and risers. The stringers looked good... but we would assemble them in the garage on the workbench where we had better control and wouldn't be working in cramped conditions.
We used lots of glue, screws and air nails.
We made all the risers from 1/2" plywood and cut the treads to length. In about two hours we put it all together. We now just let it sit while the glue dried.
We wanted to put the siding back on the house before putting the stairs in place... as it would be really hard to install the siding after. We put horizontal 2x4's for nailing the siding to with two layers of 1" Styrofoam insulation between... and it is here we could correct the small discrepancy of the house being not square with the old garage and our new building. It was less than one inch out of square... no big deal.
But before I could cover the 3x8 posts at each end, I knew I needed the engineer's approval. Ritchie Smith asked me to send him several photos of the posts with close-ups of how they were attached and very soon after emailing them to him he gave me the green light to go ahead and cover.
So the next morning we re-installed the vertical channel cedar siding... anxious to get our new stairs in place. But it was not as simple to get the stairs into place as I had imagined. They were really heavy... and there was not enough room to get them in from the front step... try as we may it was a "no go."
So plan B was to take out three or four studs in the new master bedroom closet so we could slide them into place parallel from behind. It was a piece of cake... howbeit a heavy piece of cake!
We were so excited to get them installed... but my first time walking up and down told me I had miss calculated the headroom clearance and made the opening for the stairwell too small.
I made a call to the building inspector to find out for sure what the building code was for headroom clearance. If I was going to fix it, I only wanted to do it once. The inspector was very helpful and told me the minimum code was 6 foot 5 inches... 77 inches vertical clearance from stair nosing to header. I checked and as it sat at the time it was 75 inches. Close but no cigar. It had to be changed.
So out came the chain saw. We pulled out all the nails from the joist hangers and in no time the surgery was complete.
Here is an action shot of the header and about a foot of the TGI's coming down.
And here is the finished repair job.
With a simple stud cut to the right length and a lever with fulcrum we had the header moved over a foot and up tight to the floor plywood as tight as ever. This repair fix took no more than about an hour and we now have headroom clearance of 80 inches... 3 more inches than the minimum code required. It feels alright now. You can see the pencil line where the joist hanger used to be on the joist.
If Michael Jordan comes to visit he will have to duck his head... but for the rest of us it will do just fine.
This is the first wall that we built... the short wall back of the storage, over the garage.
The next day we had more walls built... and I now had to do something to protect our house from water penetration. I needed to get the cricket built. Shirley hadn't heard that word used before for the small false roof used to divert water away from an obstacle, a chimney, etc. Check it out.
So we snapped a couple of chalk lines to layout the cricket. One on the wall of the new studio and another on the roof where we would cut away the shingles. There would be a new valley with a fall of about two feet when completed. But first we have to cut the shingles and remove the ones that go in the area of the new cricket.
Once again we used the tractor to haul away the ripped off shingles.
Then we started to build the cricket... each support rafter was progressively longer as the cricket widened.
Once the cricket was built we put 6 mil poly from wall to wall, over the skylights and everything, holding it in place with 1 x 4's and then tapping the poly to the new plywood wall. Brendan said that this was a 100% fix... and we are ready now the new roof in this area.
Friday was a sunny day and we not only got up all the floor joists for the loft, but also most of the T & G floor plywood.
The higher we get in this new building the more spectacular the view gets. This storage loft is begging to have a few skylights... and I am thinking they might be the Velux opening type. They may also be helpful for ventilation on hot summer days.
On Sunday afternoon I did the layout for the new stairs which had a 7-5/8" rise and 10" run.
I enjoyed cutting out the stair pattern with the circular saw...
I then cut out the corners with the jig saw to avoid over cutting and losing strength.
I just tacked the stringers in place to see how they looked before cutting out the treads and risers. The stringers looked good... but we would assemble them in the garage on the workbench where we had better control and wouldn't be working in cramped conditions.
We used lots of glue, screws and air nails.
We made all the risers from 1/2" plywood and cut the treads to length. In about two hours we put it all together. We now just let it sit while the glue dried.
We wanted to put the siding back on the house before putting the stairs in place... as it would be really hard to install the siding after. We put horizontal 2x4's for nailing the siding to with two layers of 1" Styrofoam insulation between... and it is here we could correct the small discrepancy of the house being not square with the old garage and our new building. It was less than one inch out of square... no big deal.
But before I could cover the 3x8 posts at each end, I knew I needed the engineer's approval. Ritchie Smith asked me to send him several photos of the posts with close-ups of how they were attached and very soon after emailing them to him he gave me the green light to go ahead and cover.
So the next morning we re-installed the vertical channel cedar siding... anxious to get our new stairs in place. But it was not as simple to get the stairs into place as I had imagined. They were really heavy... and there was not enough room to get them in from the front step... try as we may it was a "no go."
So plan B was to take out three or four studs in the new master bedroom closet so we could slide them into place parallel from behind. It was a piece of cake... howbeit a heavy piece of cake!
We were so excited to get them installed... but my first time walking up and down told me I had miss calculated the headroom clearance and made the opening for the stairwell too small.
I made a call to the building inspector to find out for sure what the building code was for headroom clearance. If I was going to fix it, I only wanted to do it once. The inspector was very helpful and told me the minimum code was 6 foot 5 inches... 77 inches vertical clearance from stair nosing to header. I checked and as it sat at the time it was 75 inches. Close but no cigar. It had to be changed.
So out came the chain saw. We pulled out all the nails from the joist hangers and in no time the surgery was complete.
Here is an action shot of the header and about a foot of the TGI's coming down.
And here is the finished repair job.
With a simple stud cut to the right length and a lever with fulcrum we had the header moved over a foot and up tight to the floor plywood as tight as ever. This repair fix took no more than about an hour and we now have headroom clearance of 80 inches... 3 more inches than the minimum code required. It feels alright now. You can see the pencil line where the joist hanger used to be on the joist.
If Michael Jordan comes to visit he will have to duck his head... but for the rest of us it will do just fine.
This is the first wall that we built... the short wall back of the storage, over the garage.
The next day we had more walls built... and I now had to do something to protect our house from water penetration. I needed to get the cricket built. Shirley hadn't heard that word used before for the small false roof used to divert water away from an obstacle, a chimney, etc. Check it out.
So we snapped a couple of chalk lines to layout the cricket. One on the wall of the new studio and another on the roof where we would cut away the shingles. There would be a new valley with a fall of about two feet when completed. But first we have to cut the shingles and remove the ones that go in the area of the new cricket.
Once again we used the tractor to haul away the ripped off shingles.
Then we started to build the cricket... each support rafter was progressively longer as the cricket widened.
Once the cricket was built we put 6 mil poly from wall to wall, over the skylights and everything, holding it in place with 1 x 4's and then tapping the poly to the new plywood wall. Brendan said that this was a 100% fix... and we are ready now the new roof in this area.
Friday was a sunny day and we not only got up all the floor joists for the loft, but also most of the T & G floor plywood.
The higher we get in this new building the more spectacular the view gets. This storage loft is begging to have a few skylights... and I am thinking they might be the Velux opening type. They may also be helpful for ventilation on hot summer days.
Labels:
cricket,
flowers Mayne Island,
Ritchie Smith engineer,
stairs,
view
Saturday, October 8, 2011
Construction Update September 25 to 30, 2011
Today I will try to get the construction of the last two weeks documented with photos... and it will likely take two blog posts.
Here is a little custom cutting to combine a top plate to tie together the new pantry wall to the old house and a new support post at our front door in the existing wall.
This top plate ties into the 3" x 8" post that fits into the wall and will support an :LVL beam that carries the wall and roof load adjacent to the house. This is the only part of the old house that we have used to carry any of the new construction...
Only in this corner of the original laundry room closet does our new addition overlap our existing house. Once the beams and joists are in place it will take away a small corner of the closet about 15" x 18"... you can see what we had to cut out to make room for the floor joists to be installed.
In order to build the stairwell and finish off the floor joists right up to the house we had to remove all the shingles, soffit and rafter tails on the eaves on the entry side of our house. Brendan has lots of experience taking off old cedar shakes to install new roofing... the past three years his main job had been with a roofing sub-contractor.
The chainsaw was the easiest way to cut off the rafter tails. And Brendan did a great job of cutting them off without hitting any nails... which was a little tricky.
Brendan is setting the TGI's into the header for the stairwell. I removed the rest of the siding in this section so that I could put it back and cover the new support posts as well as the LVL beam adjacent to the house.
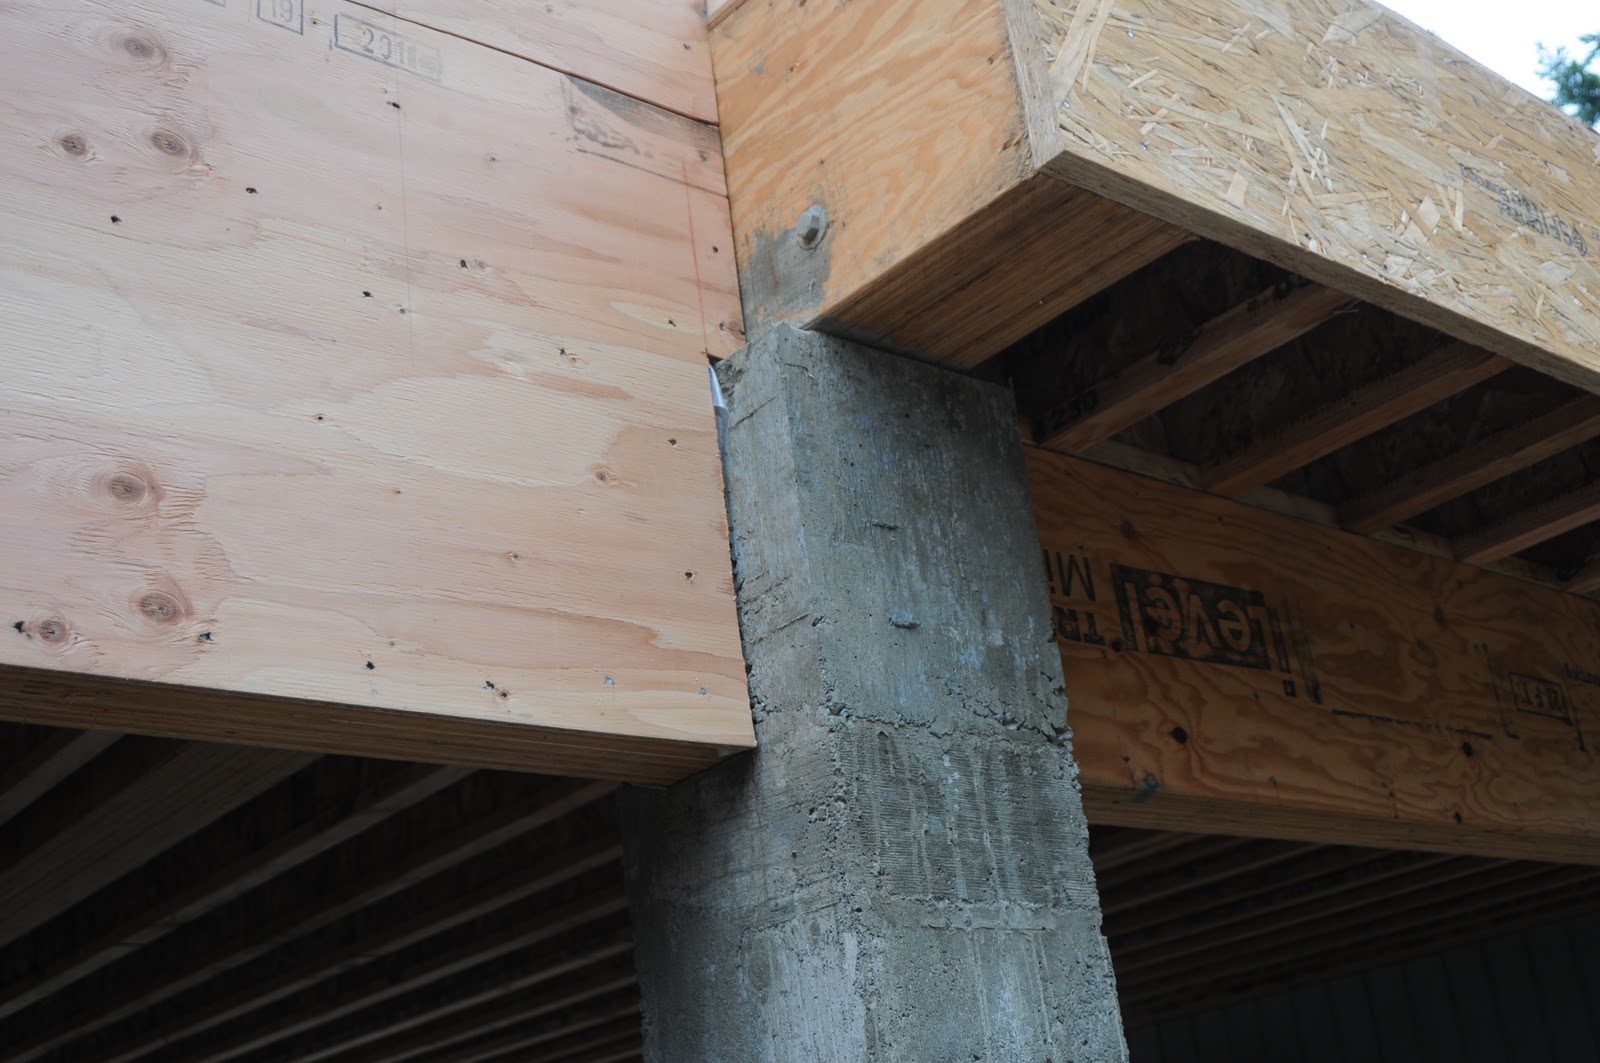
Before we put the 3/4 inch T&G floor plywood on the studio joists, I wanted to extend the concrete posts higher to encase the LVL beams... it would be impossible to do it afterwards. Ritchie Smith liked this idea, but told me to protect the wood from any reaction of the concrete... so I stapled some 6 mil poly to the beams first. Each beam has either two 1/2 inch rebars or ready-rods that go thru the beam and are attached to vertical rebars in the concrete. This is on Foundation post #4.
Each one was a little different, but the concept was always the same. Here on the top of Foundation Post #2 I used a ready-rod thru the beam, and wrapped a rebar around the end of the LVL 3-ply beam and back to the other end of the same ready-rod. After the concrete is poured into the form we will face three of the four posts with 3" of sandstone rock.
This is the detail of the post inside the garage... Foundation Post #1... the only one that will not be faced with rock after. Note how we also put four 1/2" x 3" lag bolts with washers to help hold the concrete and the beam together. In the end of the beam I used a couple of 5" long lags. This is all to help to keep the beams from twisting under seismic pressure.
Here is Foundation Post #3 with forms in place ready for concrete. It was no small task to get the concrete into the small opening on the top of each of these. Thus we had to do this before putting any of the floor plywood. Even Shirley helped Brendan and me to place the concrete. It took three full wheelbarrows of concrete... plus another part mix to fill all four forms. This one task took almost a full day to complete.
Once we stripped the forms off and saw the concrete done, it just looked like it was always that way. Now, with this concrete post complete, it gives me the base on which I will apply the rock facing. But the most important thing is that structurally it keeps the integrity of the LVL beams from any movement... much better than any metal Simpson bracket one can buy.
We look for every opportunity to use the tractor to help us lift anything up. We were able to take about 6 or 7 sheets of 3/4" T & G fir plywood at one time... and the studio floor will need about 32-34 sheets.
We put down floor plywood on this entire level in a single day and used over 15 pounds of 2" deck screws. This floor had better not even think of squeaking!
I was not prepared for the great view that we had once we were standing on the studio floor. See Shirley's garden boxes on the knoll.
When Brendan told me around 11 AM that he was not feeling good and wanted to quit at noon, I told him no problem and Shirley went with me to Victoria for the afternoon. I was able to pick up some supplies... like a lift of 60 sheets of 1/2" sheathing for the walls, two 12" x 14 foot stair stringers and 1" stair tread material in 12 foot lengths and a new chain saw.
By banding the 14-foot boards to the plywood I was able to bring them home in my short box pickup with no problem. This truck has never came home from Victoria once in the past three years without having a load of gravel or something. We seldom take the car to town as there is always of load to bring back.
Labels:
concrete,
construction,
floor plywood,
new studio,
renovation
Subscribe to:
Posts (Atom)