Saturday, October 8, 2011

Construction Update September 25 to 30, 2011

Today I will try to get the construction of the last two weeks documented with photos... and it will likely take two blog posts.

Here is a little custom cutting to combine a top plate to tie together the new pantry wall to the old house and  a new support post at our front door in the existing wall.

This top plate ties into the 3" x 8" post that fits into the wall and will support an :LVL beam that carries the wall and roof load adjacent to the house.  This is the only part of the old house that we have used to carry any of the new construction...

Only in this corner of the original laundry room closet does our new addition overlap our existing house. Once the beams and joists are in place it will take away a small corner of the closet about 15" x 18"... you can see what we had to cut out to make room for the floor joists to be installed.

In order to build the stairwell and finish off the floor joists right up to the house we had to remove all the shingles, soffit and rafter tails on the eaves on the entry side of our house.  Brendan has lots of experience taking off old cedar shakes to install new roofing... the past three years his main job had been with a roofing sub-contractor.

The chainsaw was the easiest way to cut off the rafter tails.  And Brendan did a great job of cutting them off without hitting any nails... which was a little tricky.

Brendan is setting the TGI's into the header for the stairwell.  I removed the rest of the siding in this section so that I could put it back and cover the new support posts as well as the LVL  beam adjacent to the house.

Before we put the 3/4 inch T&G floor plywood on the studio joists, I wanted to extend the concrete posts higher to encase the LVL beams... it would be impossible to do it afterwards.  Ritchie Smith liked this idea, but told me to protect the wood from any reaction of the concrete... so I stapled some 6 mil poly to the beams first.  Each beam has either two 1/2 inch rebars or ready-rods  that go thru the beam and are attached to vertical rebars in the concrete.  This is on Foundation post #4.

Each one was a little different, but the concept was always the same.  Here on the top of Foundation Post #2  I used a ready-rod thru the beam, and wrapped a rebar around the end of the LVL 3-ply beam and back to the other end of the same ready-rod.  After the concrete is poured into the form we will face three of the four posts with 3" of sandstone rock. 

This is the detail of the post inside the garage... Foundation Post #1... the only one that will not be faced with rock after.  Note how we also put four 1/2" x 3" lag bolts with washers to help hold the concrete and the beam together.  In the end of the beam I used a couple of 5" long lags.  This is all to help to keep the beams from twisting under seismic pressure.

Here is Foundation Post #3 with forms in place ready for concrete.  It was no small task to get  the concrete into the small opening on the top of each of these.  Thus we had to do this before putting any of the floor plywood.  Even Shirley helped Brendan and me to place the concrete.  It took three full wheelbarrows of concrete... plus another part mix to fill all four forms.  This one task took almost a full day to complete.  
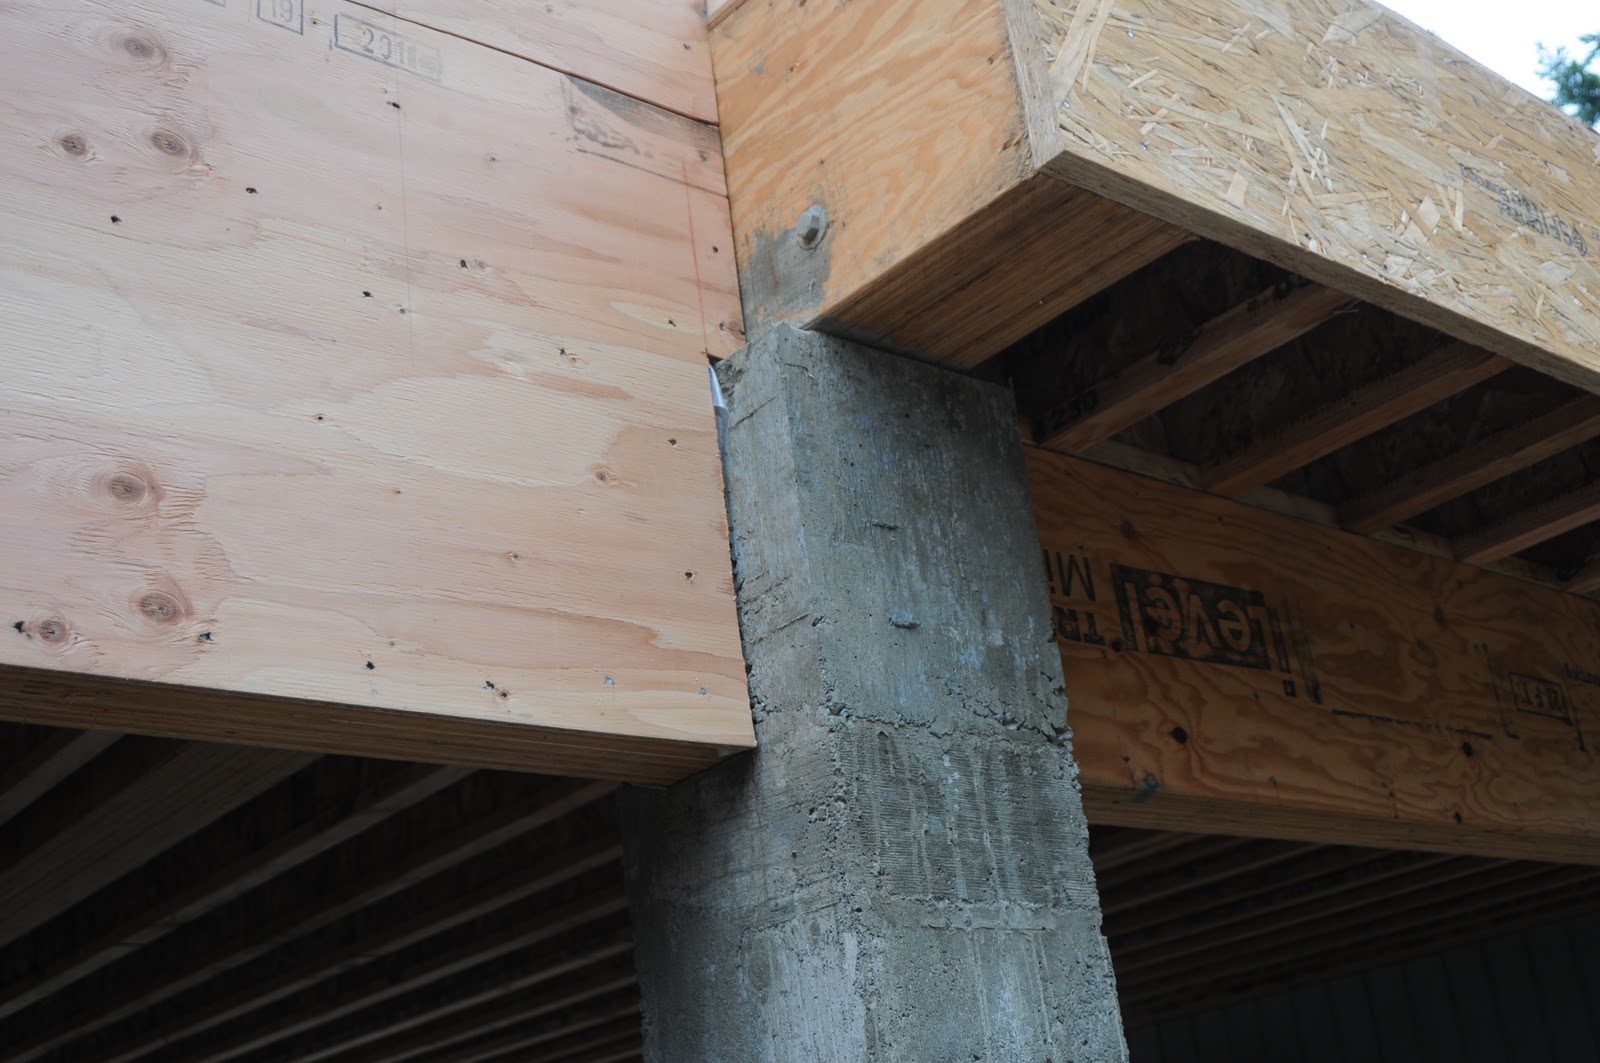
Once we stripped the forms off and saw the concrete done, it just looked like it was always that way.  Now, with this concrete post complete, it gives me the base on which I will apply the rock facing.  But the most important thing is that structurally it keeps the integrity of the LVL beams from any movement... much better than any metal Simpson bracket one can buy.

We look for every opportunity to use the tractor to help us lift anything up.  We were able to take about 6 or 7 sheets of 3/4" T & G fir plywood at one time... and the studio floor will need about 32-34 sheets.

We put down floor plywood on this entire level in a single day and used over 15 pounds of 2" deck screws.  This floor had better not even think of squeaking!

I was not prepared for the great view that we had once we were standing on the studio floor.  See Shirley's garden boxes on the knoll.  

When Brendan told me around 11 AM that he was not feeling good and wanted to quit at noon, I told him no problem and Shirley went with me to Victoria for the afternoon.  I was able to pick up some supplies... like a lift of 60 sheets of 1/2" sheathing for the walls, two 12" x 14 foot stair stringers and 1" stair tread material in 12 foot lengths and a new chain saw.

By banding the 14-foot boards to the plywood I was able to bring them home in my short box pickup with no problem.  This truck has never came home from Victoria once in the past three years without having a load of gravel or something.  We seldom take the car to town as there is always of load to bring back.


Sunday, September 25, 2011

The Floor Joist Week

The first order of business this week was to remove the upper portion of the first three trusses of the garage so that we could set up the TGI's (engineered floor joists) on the beams.  Here Brendan is cutting thru the end gable truss after we had just completed removing all the shingles... hence the shadows from the roof strapping on the wall.

With the siding removed off the end gable and all the strapping taken off that section, we are ready to take off the end gable.

With a rope attached at the top of the gable, Brendan lowered it slowly and I was in position to receive it and take it away to separate the plywood from the 2 x 4's.  It came down perfectly!

Taking down the tops of the other trusses was pretty easy once they were cut off... Brendan just passed them down to me.  We then had to temporarily support those few trusses with 2 x 4's from the garage floor until we had some floor joists to attach them to.

After putting up the heavy LVL beams, these TGI's were light and much easier to handle... however, every one had to be cut to the right length first.

From the cutting table we lifted one end on to the beam...

I would then push the TGI just over half way so it would teeter into Brendan's hands.

And he would walk it up the ladder and set in place on the beam.

With an air nailer it made spiking the TGI's in place pretty easy and quick to secure.

At the mid point we had to assemble a 5-ply beam, which we used the tractor to carry these heavy LVL's (Laminated Veneer Lumber) to it's final resting place.

With a chain we kept the LVL attached to tractor bucket extension and Brendan walked beside it balancing it.

The tractor took the hard lifting out of this job.  Brendan just had to balance it into place as I drove forward putting the beam over the other beam.  We got to do this 5 times here... as this is the heaviest beam here.  With five ply's this one ends up 8.75 inches wide by 16 inches high and about 33 feet long.

On the other end the tractor lifts the beam close and Brendan takes up the final bit into place.

There is no doubt that the little tractor really helped to reduce the lifting we would have had to do.  It actually made setting up these beams fun!

This was a little sketch I did to figure out the bolt layout for this five-ply beam.  In addition to nailing each ply together with four rows of nails a foot apart... we also needed 5/8" bolts every 16 inches to secure these layers to make one very solid beam.  By determining the layout for the blots we could then nail with confidence knowing we wouldn't be hitting a nail when drilling holes for the bolts.  This helped me determine we needed to buy 24 10-inch 5/8" bolts with 24 nuts and 48 heavy washers.

It sure felt good to have most of the TGI's in place and this heavy beam in place... with the trim boards in place.  We left this centre beam un-trimmed for now... as this will carry a canopy roof that connects to the new master bedroom closet.  At this time I don't know exactly how that roof is going to come together.  There are a few possibilities of how much soffit it will have and how this will work best.

Shirley took this shot from her "Sunken Jungle."  It was a good week.

We still have the TGI's to put over the pantry and closet... but before we can do that we have some walls to build there as well as tear off the old eaves of the house in those areas.  With all the rain in the forecast we have left those eaves in tact as long as possible.

We pulled our car into it's future parking place on Saturday... where I took this photo of Shirley as we were heading out to an evening fund raiser for Pat Hennebery, the father of Brendan, who is suffering with Parkinson's Disease.   It won't be too hard to get used to this luxury.

Once again all the photos in this blog except this last one were taken by Shirley... who only charges me $1,000 for each one I use.


Saturday, September 17, 2011

Concrete Completed and Now Framing Starts

The delivery of truss joists and LVL beams took about 8 trips... and this was the first load.  The driver brought a small load so he could check out the route... he did not want to take out any low hanging telephone or power lines coming up the hill and he wanted to see where he had to bring the load.

There were 19 LVL beams... some up to 36 feet long! ...and we just piled them up along the side of the driveway, using the tractor to help to push them into place.

We moved the truss joists off the truck onto the tractor...

and stacked them on the gravel yard by the greenhouse.  The whole delivery process happened over four days and involved a lot of hand work.  There is still 27 more roof truss joists to come... and I think Atlas Truss will be having Home Hardware pick them up in Vancouver and bring to me directly.

This concrete slab will be under the stairs to the studio... and will be the floor of our new recycle department.  At last this is the end of the concrete work!  Hip, hip hooray!

New lumber!  Nice clean 2 x 10's!  I had to move a water service out of the corner and pull out the PVC storm water collection pipe.

 Shirley is excited to see the floor joists for her new closet. 

This is a close-up of the Simpson tie down of a 3-ply 2 x 6 post, which will carry one end of the longest 36-foot beam.

On Wednesday we went to Victoria and instead of bringing back the usual load of gravel from Trio, we picked up a lift of 3/4" T & G Fir floor plywood.  I was amazed at how the they used two fork lifts to get this heavy load on to my pickup in less than a minute.  One brought the lift of plywood over to the back of the truck... the second one (in photo above) came and then picked it up by the end so the other fork lift could back away so he could slide the load into the back of truck.  Very slick.

Once at home it was a little more work to take it off one sheet at a time.  Here Shirley, who helped with every sheet, poses as if she did the whole thing herself!

This is the pantry... the floor joists are 3" x 8" fir... left over from Jack's house next door.  What a solid floor this is.  I connected the dryer vent before screwing down the 3/4" T & G sub-floor.

Friday was the first day that Brendan Henneberry came to work with me... so we started by setting up the long beams.  Using the tractor we dragged the beam close to where we needed it and then balancing the beam on the bucket extension lifted it as high as possible.

Brendan is getting ready to lift his end over the rebar into place on top of the column.

Each major beam is made up of three ply's of LVL... each one 1-3/4" x 16" by either 34 or 36 feet.  With each layer we added we refined our process so we could use the tractor more and have to do less heavy lifting ourselves.

On the second major beam I screwed a few boards to the end of the bucket extension that gave us a little more lift.  Once we were done we had our technique perfected.

Once the major beams were up we spent the rest of the afternoon taking down eavestrough and facia boards.  In order to put the new floor joists into the garage section, we have about six feet of trusses, roofing, etc. to remove... so we will be in the destruction business for a little while.

We also started to remove the eavestrough, facia and soffits on the house.  By this time next week we hope to have the main floor deck completed... floor joists and plywood in place.